


Event software training
How to use Supplier Management?
Every event runs on suppliers: the venue, the caterer, the band, the photographer, the security team. Suppliers, also called Supplier Management, keeps all of them in one place per event: who they are, how to reach them, which steps you still have to take with them, and the tasks, contacts, conversations and budget lines that belong to them. It is part of the event software of eventplanner.net, and every event gets its own supplier list.
The view works both ways. In the supplier list, you see every supplier of your event with the status of its checks at a glance. On the page of one supplier, you see everything that is tied to that supplier: its details, its checks, its tasks, the people you work with there, your conversations with them and what they cost you.
Want to see what Suppliers can do for you before you start? Have a look at the overview page first.
Where to find it: log in, choose event software in the main menu and open Suppliers in the menu of your event.
1. Before you start
Suppliers is a .PRO tool
Suppliers is only available to .PRO members. Without a membership you see Unlock .PRO features instead of the supplier list, with a button to upgrade.
The membership is checked per person, not per event. Every team member who opens Suppliers needs their own .PRO membership, also when the owner of the event is a member and gave them access to the tool. We recommend .PRO for the core organising team: the people who add suppliers, follow up the checks and handle the contracts. Colleagues who only need the tasks or the budget can keep working in those tools without a membership.
An event
Suppliers belong to an event, so the first time you open Suppliers you are asked to create one. Click Add your first event, fill in a name, a date and the type of event, and save. Read how to set up an event for the details.
2. Add a supplier
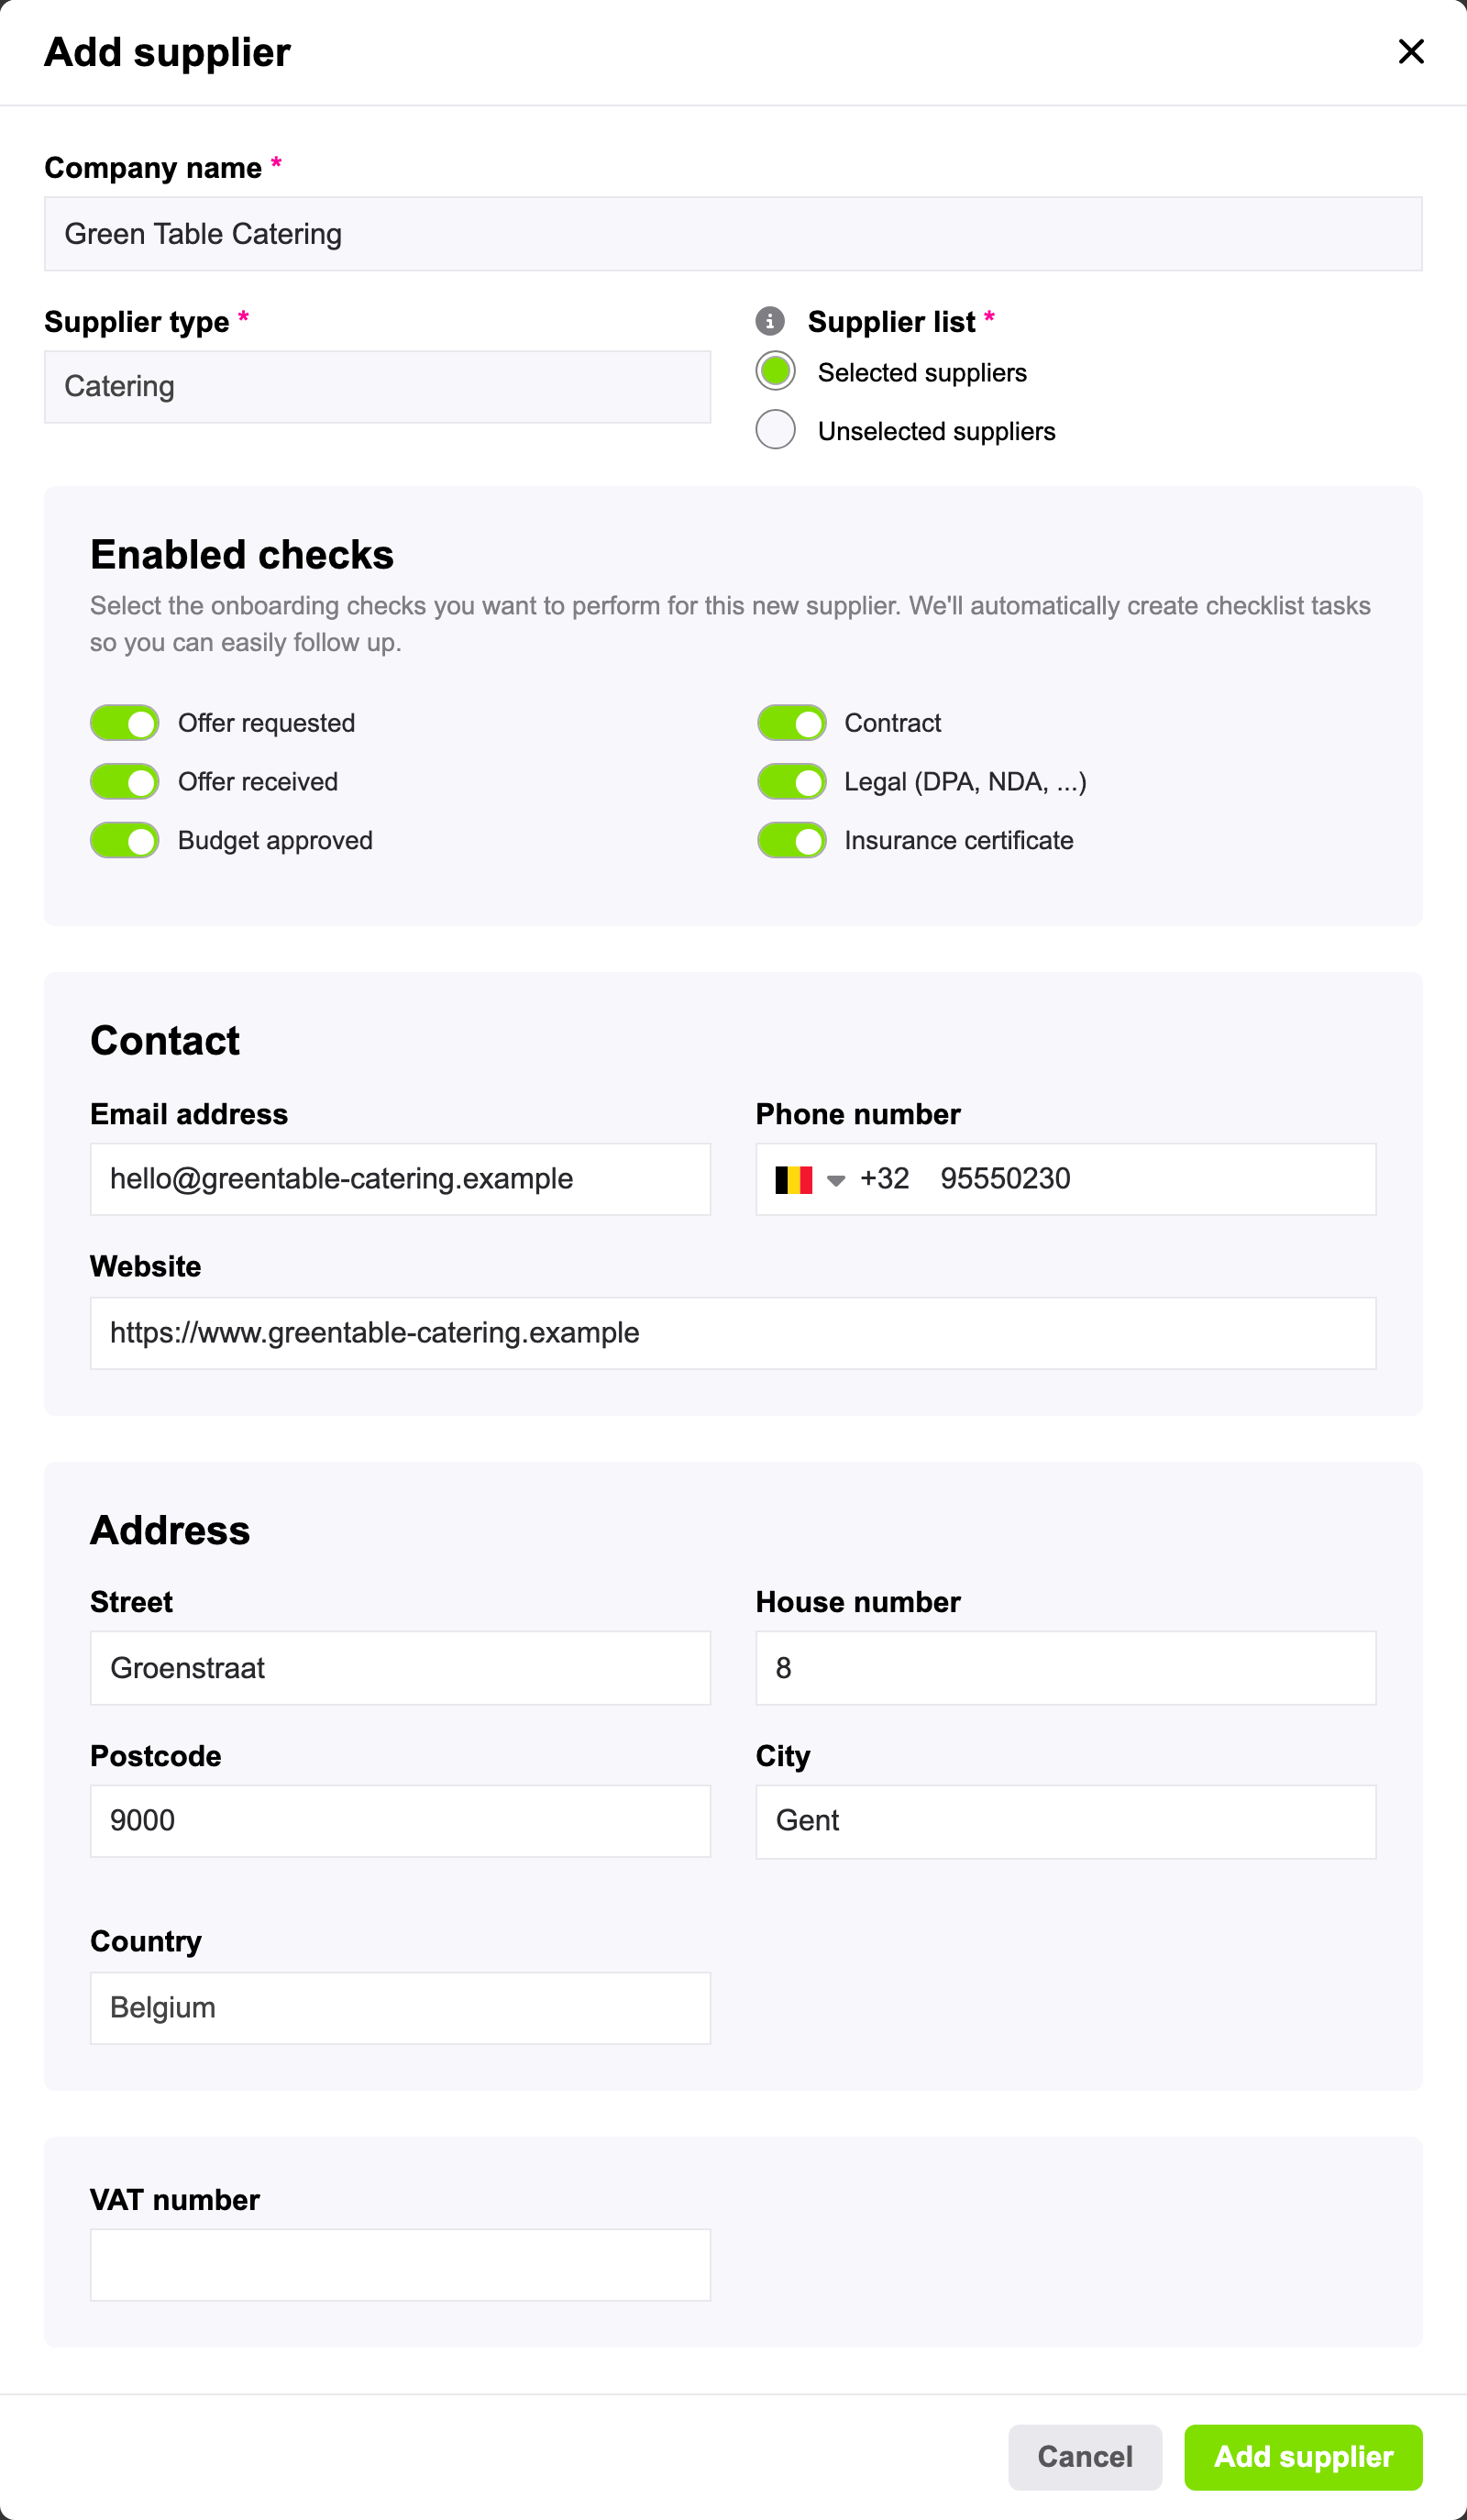
Click Add supplier. A window opens with these fields:
| Field | What to fill in |
|---|---|
| Company name | Start typing the name. Businesses with a page on eventplanner.net appear in a list: pick one to link it (see below). A business that is not in the list is fine too: just type its name and fill in its details yourself. Required. |
| Supplier type | What the supplier does for your event: catering, venue, entertainment, decoration, photo / video, rental, staff, security, transport, ... These are the same categories as the tasks of your checklist and the lines of your budget, so everything of one supplier lands under the same heading everywhere. Required. |
| Supplier list | Selected suppliers for the suppliers you work with, Unselected suppliers for the candidates and alternatives you are still comparing. Read "Selected and unselected suppliers" below. Required. |
| Enabled checks | The steps you want to follow up for this supplier, such as the quote and the contract. Every check that is on creates a task in your checklist and puts the supplier in the selected list, so turn them all off for a candidate. Section 4 explains the checks. |
| Contact | The general Email address, Phone number and Website of the supplier. The website has to be the complete address of a site that is online, such as https://www.example.com. |
| Address | Street, House number, Postcode, City and Country. |
| VAT number | The VAT number of the supplier, as it appears on its quotes. |
Click Add supplier at the bottom of the window to save. The supplier appears in the list straight away.
Link a business that is on eventplanner.net
Thousands of event venues and suppliers have a business page on eventplanner.net. When you pick one of them from the list under Company name, your supplier is linked to that business page:
- its name, address, website and VAT number come from the business page and stay up to date when the business changes them. You only fill in the e-mail address and phone number you use for this event, and the phone number of the business page is filled in for you to start with,
- the page of the supplier shows its logo and its review score,
- you can start a conversation with the business from the page of the supplier, through your eventplanner.net inbox,
- a business can be linked to an event only once. Pick a business you already added and the form refuses to save it.
Typed the name yourself because the business was not in the list? You can still link it later. Section 6 explains how.
Selected and unselected suppliers
Every supplier is in one of two lists:
- Selected suppliers are the suppliers you work with for this event. They have checks and the tasks that go with them, they can receive your briefings, and they are the suppliers we ask you to review after the event.
- Unselected suppliers are the candidates you are still comparing, a backup option, or suppliers you copied from an earlier event and have not decided on yet. Checks are for selected suppliers: turn every check off when you add a candidate, because a check puts a supplier in the selected list.
You can move a supplier from one list to the other at any time: open its page, click Edit and change Supplier list. A supplier without checks that moves to the selected list gets all checks of your event, with a task for each of them. A supplier that moves to the unselected list keeps its checks and tasks: turn them off in Enable checks (section 4) when you no longer follow it up. A supplier also moves to the selected list on its own as soon as you turn on one of its checks, link a contact to it or add a budget line for it.
3. Read your supplier list
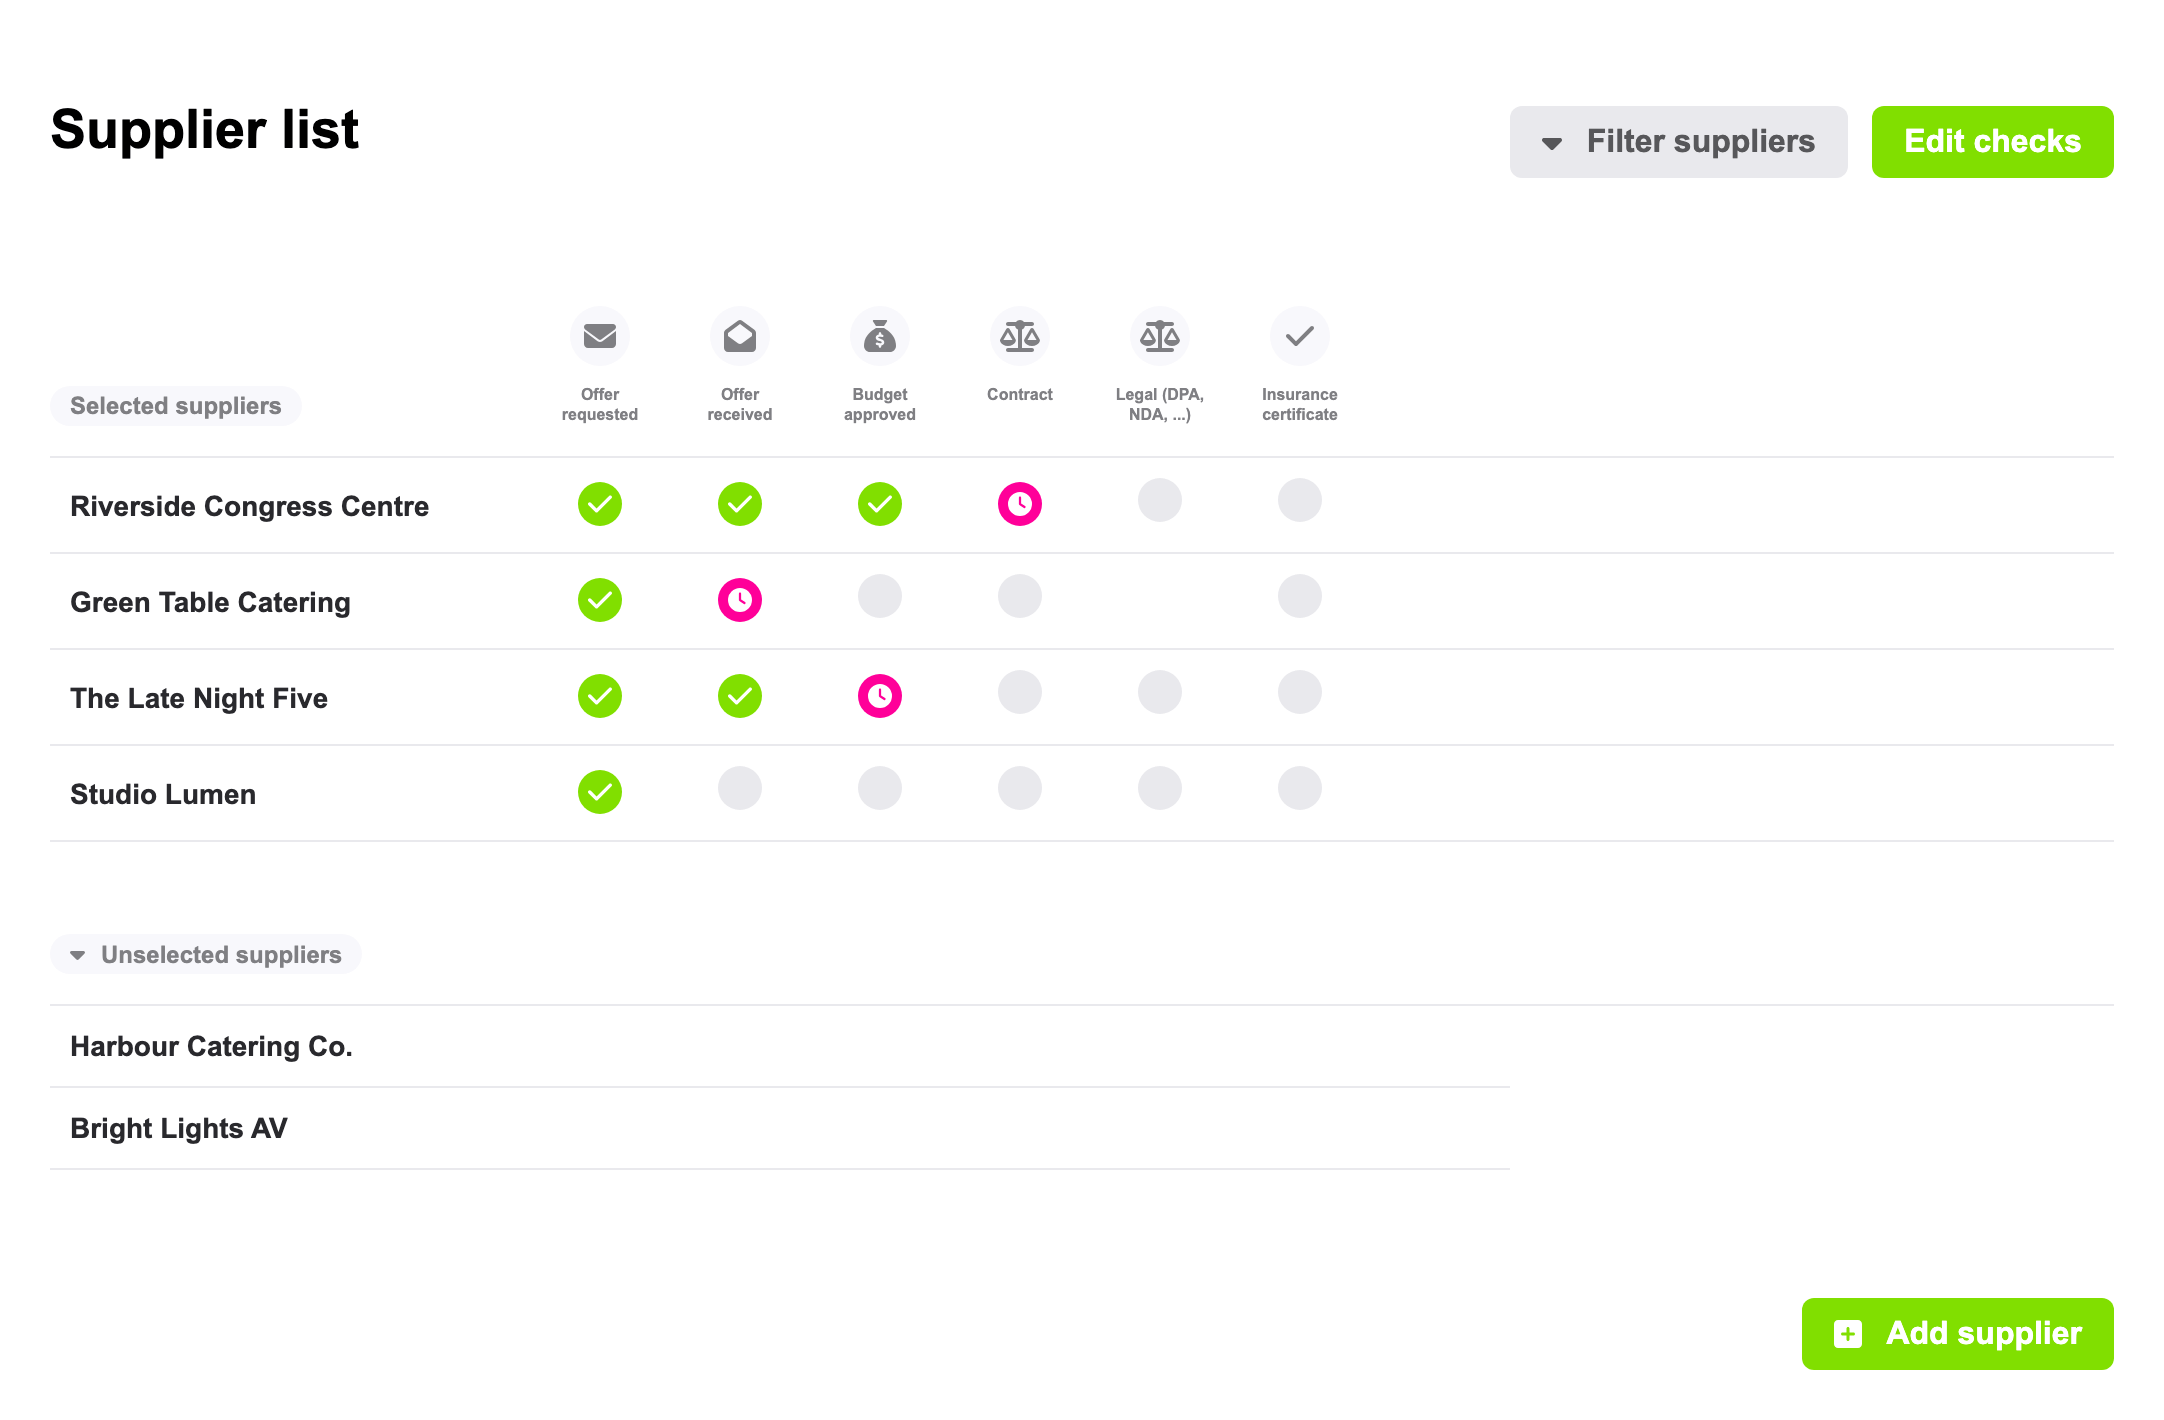
- The upper table shows your Selected suppliers, the lower one your Unselected suppliers.
- Every check of your event has its own column. The dot in a column is the status of the task of that check: a grey circle means to do, a clock means in progress, a green check mark means done. An empty cell means the check is off for this supplier.
- Click the name of a supplier to open its page.
- Click Filter suppliers to show one or more supplier types only.
4. Supplier checks: follow up every supplier step by step
A check is one step you take with a supplier before the event, from the first quote to the signed paperwork. Every event starts with the same five checks:
| Check | Done when |
|---|---|
| Offer requested | You asked the supplier for a quote. |
| Offer received | The quote is in. |
| Budget approved | The price is approved, by you or by your client, and it is in your budget. |
| Contract | The contract is signed. |
| Legal (DPA, NDA, ...) | The legal paperwork is in order: a data processing agreement (DPA) when the supplier handles personal data of your guests, a non-disclosure agreement (NDA) when they learn things that have to stay confidential, insurance certificates, and so on. |
Every check that is on for a supplier creates a task on the board of Checklists, named after the supplier and the check, such as "Riverside Congress Centre - Contract". The task is due in a week, has a low priority and is in the category of the supplier type. Plan it, assign it to a colleague and move it along like any other task: the status of the task is the status of the check, in the supplier list and on the page of the supplier. On that page, click the icon of a check in Supplier checks to open its task straight away. Read more in how to use Checklists.
Choose the checks of one supplier
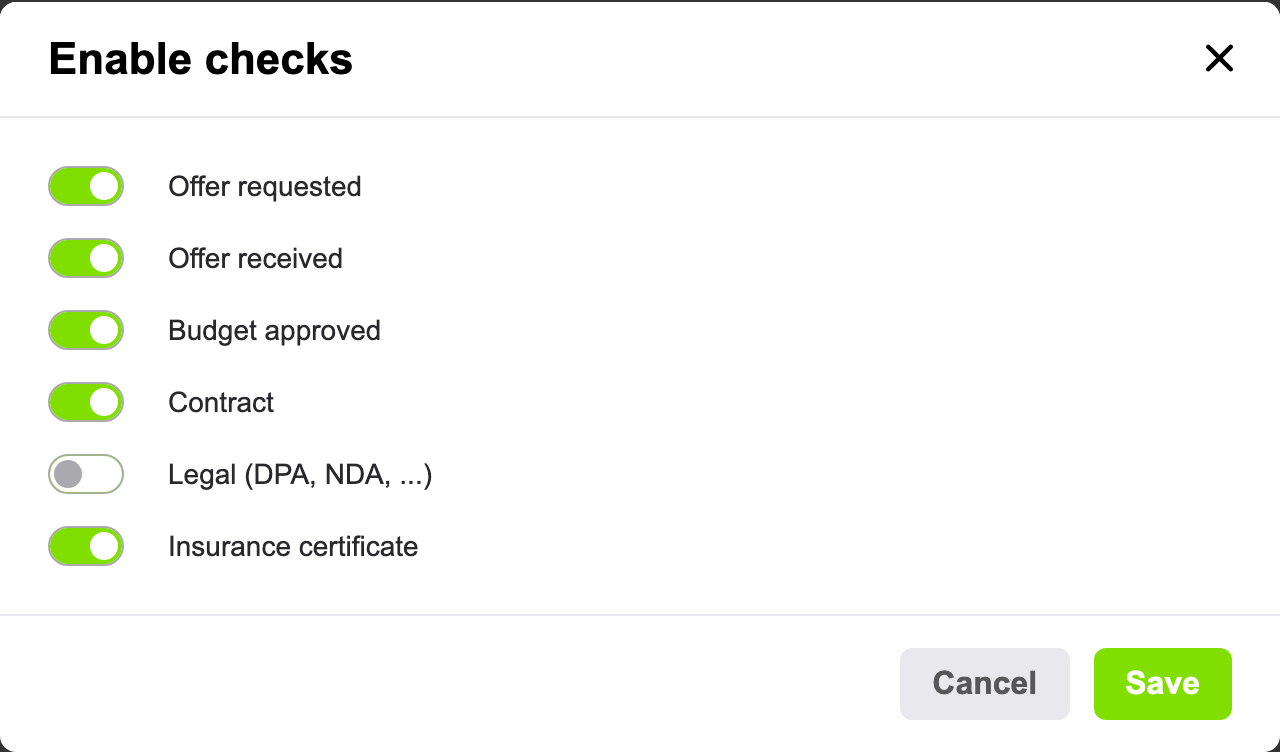
Not every check applies to every supplier: a band does not need a data processing agreement. Open the page of the supplier and click Edit in the Supplier checks block. The Enable checks window shows a switch per check. Turn a check off and its task is deleted, turn it on and a new task is created. Click Save.
Change the checks of your event
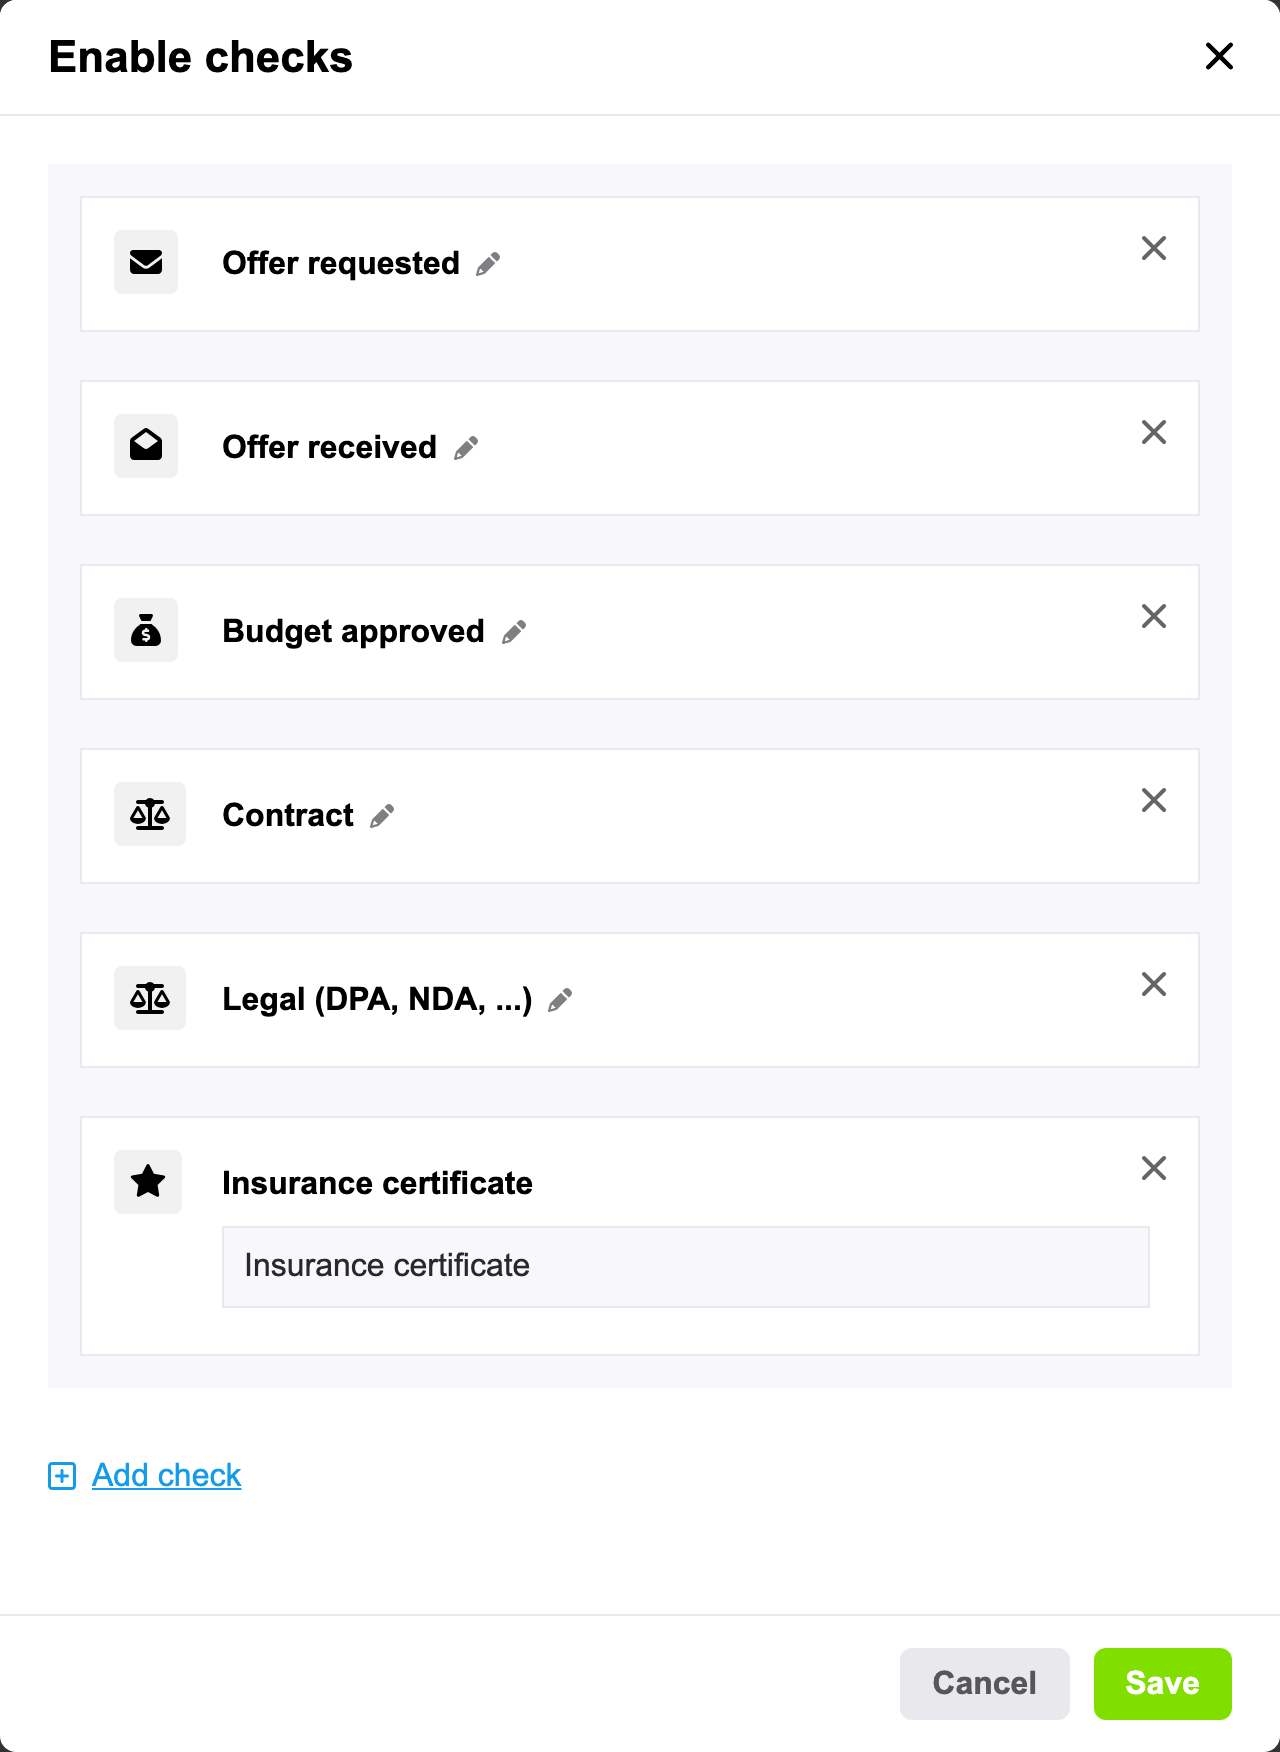
The five checks are a starting point. Want to add "Insurance certificate" or "Technical rider", or call "Contract" "Signed contract"? Click Edit checks above the supplier list. The window lists the checks of your event:
- click the pencil next to a check to rename it,
- drag a check up or down to change the order of the columns,
- click Add check to add one,
- click the cross on a check to remove it.
A new check is added to every supplier of the event, each with a new task. Removing a check removes it from every supplier, together with the tasks it created. Click Save to apply your changes.
Tip: set up the checks of your event before you add your first suppliers. Every supplier you add afterwards gets them straight away, and you decide per supplier which ones apply.
5. The page of a supplier
Click the name of a supplier in the list to open its page. It brings together everything of this supplier, in blocks:
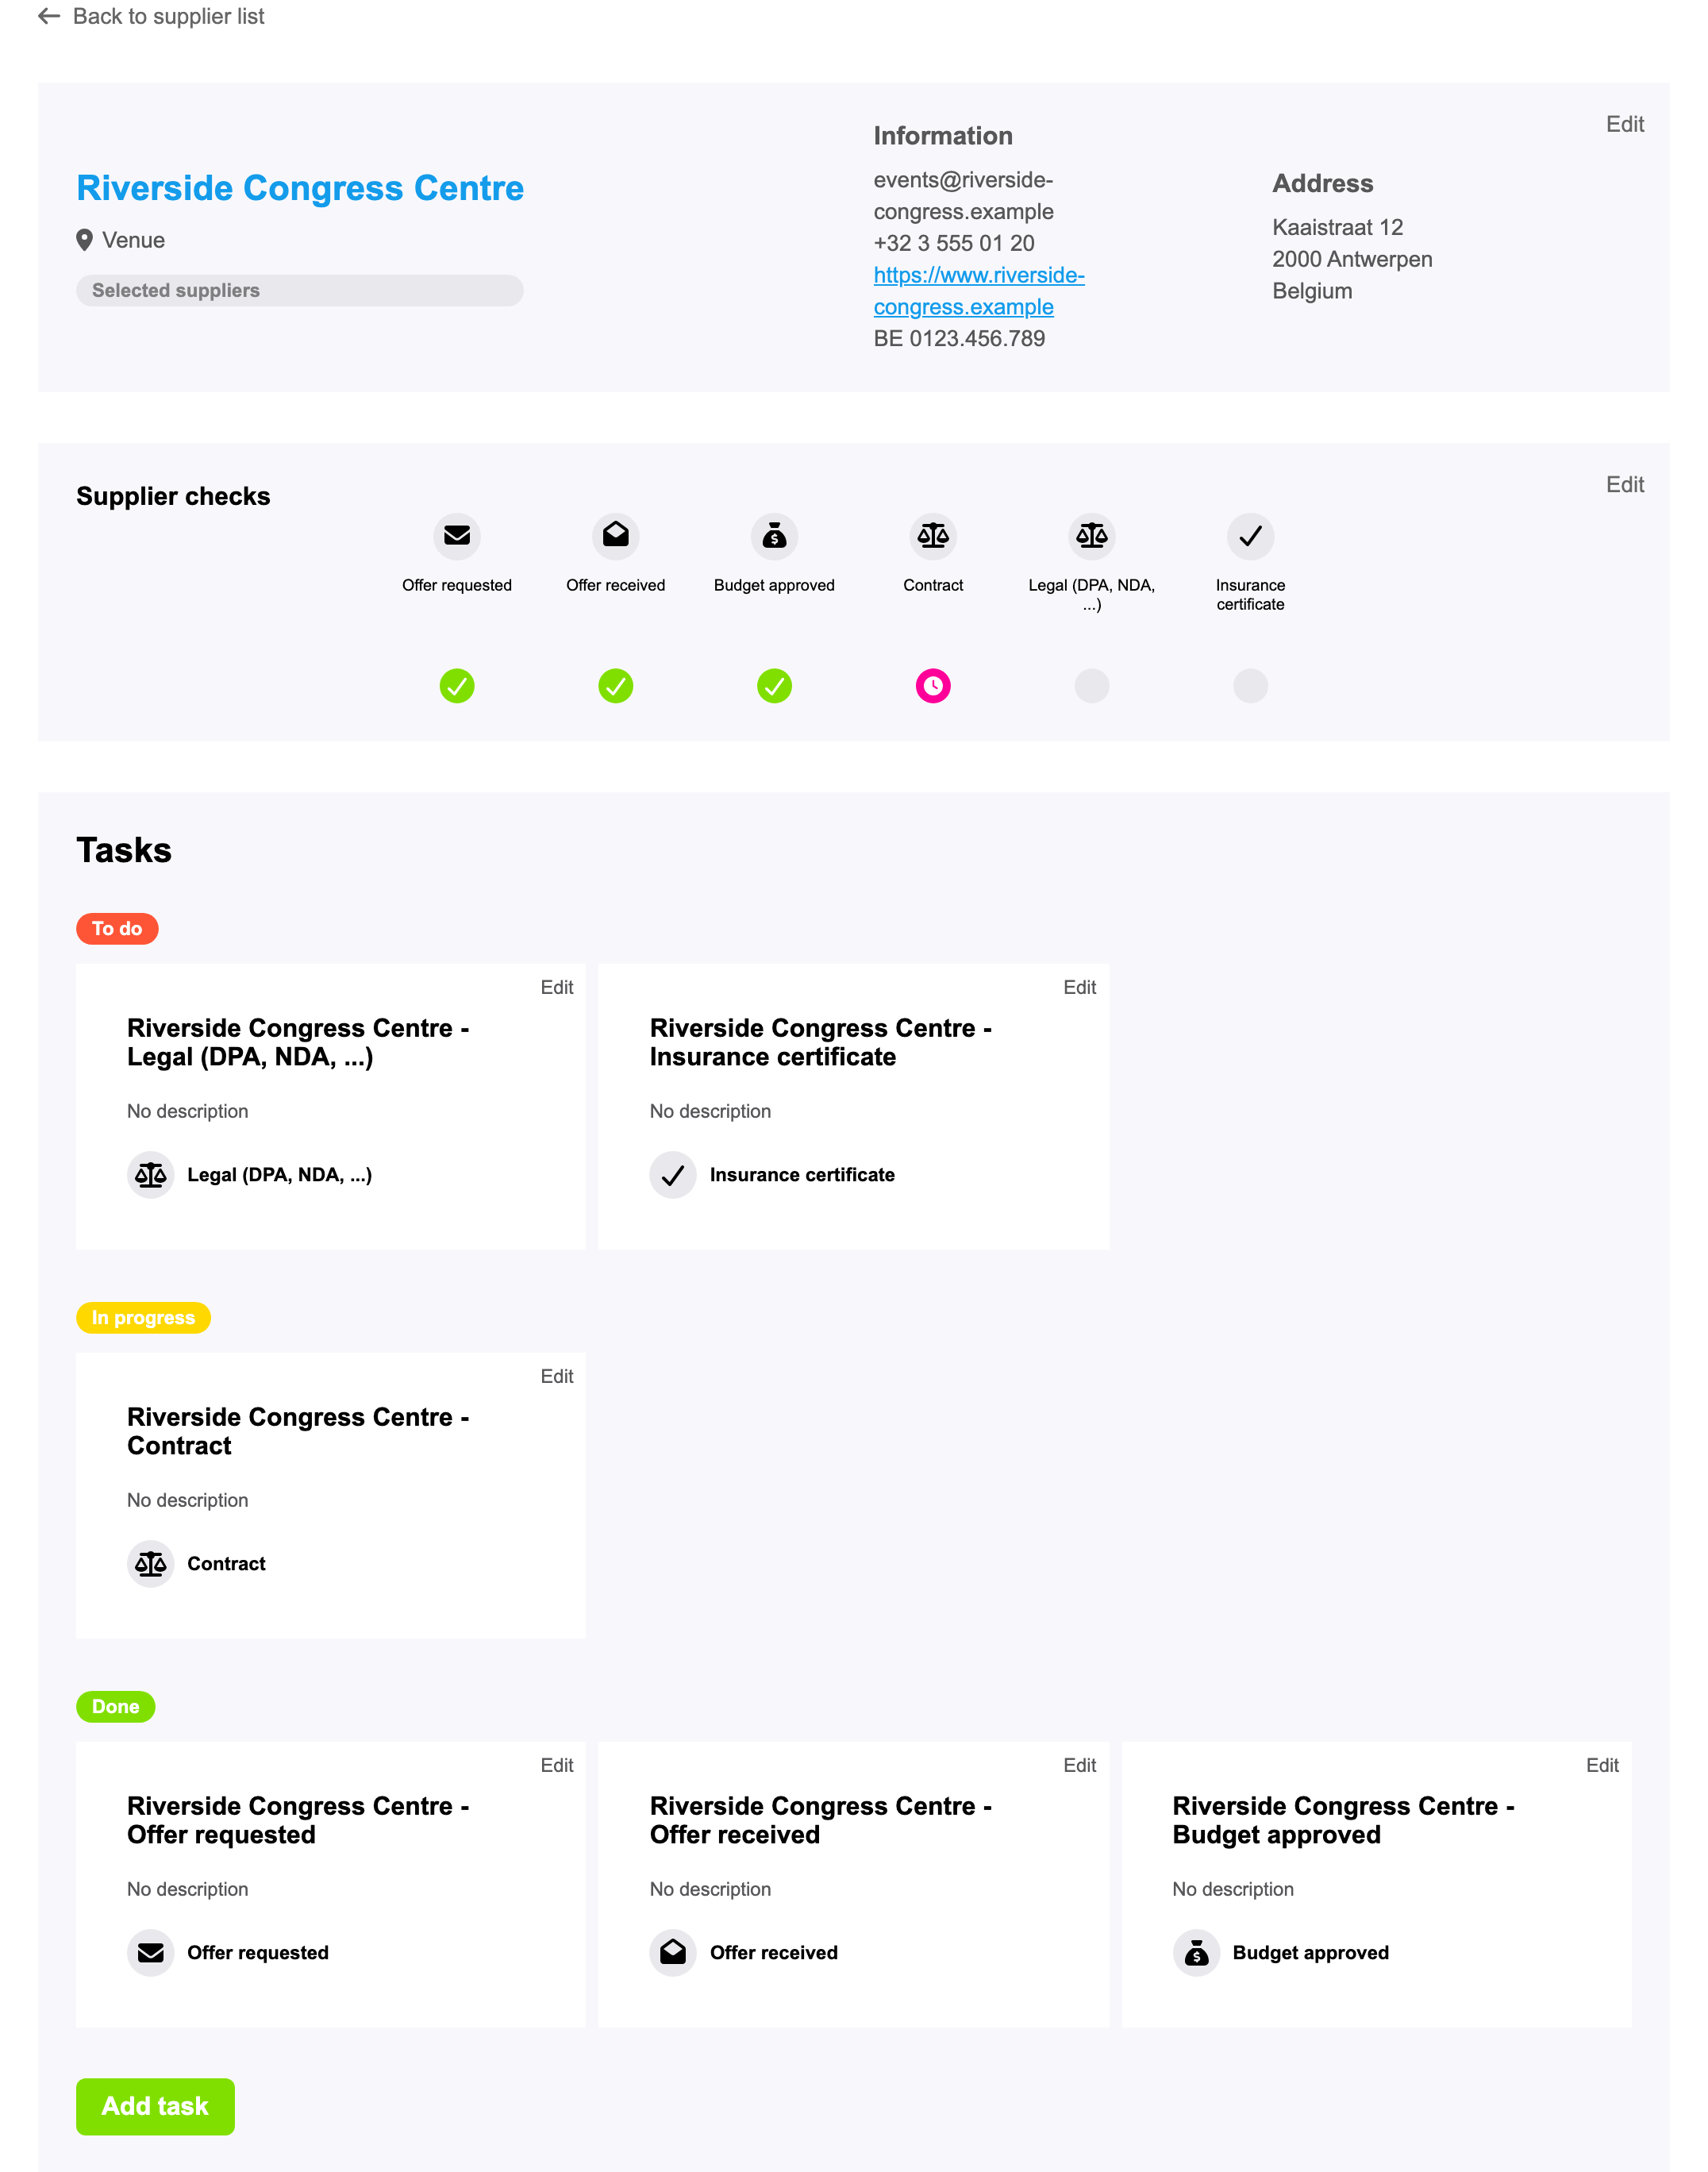
- The details at the top: name, supplier type, which list the supplier is in, and under Information and Address its e-mail address, phone number, website, VAT number and address. A linked business also shows its logo and review score. Click Edit to change the details, the supplier type or the list. For a linked business, the name, address, website and VAT number cannot be changed here: they belong to the business page.
- Supplier checks: the checks that are on for this supplier, each with its status. Edit opens the Enable checks window of section 4.
- Tasks: the tasks of this supplier in three columns, To do, In progress and Done: the tasks of its checks and the tasks you added yourself. Click Add task to add one: it is linked to this supplier and already in the right category. Click Edit on a task to change it. In Checklists, the task shows a link to the supplier.
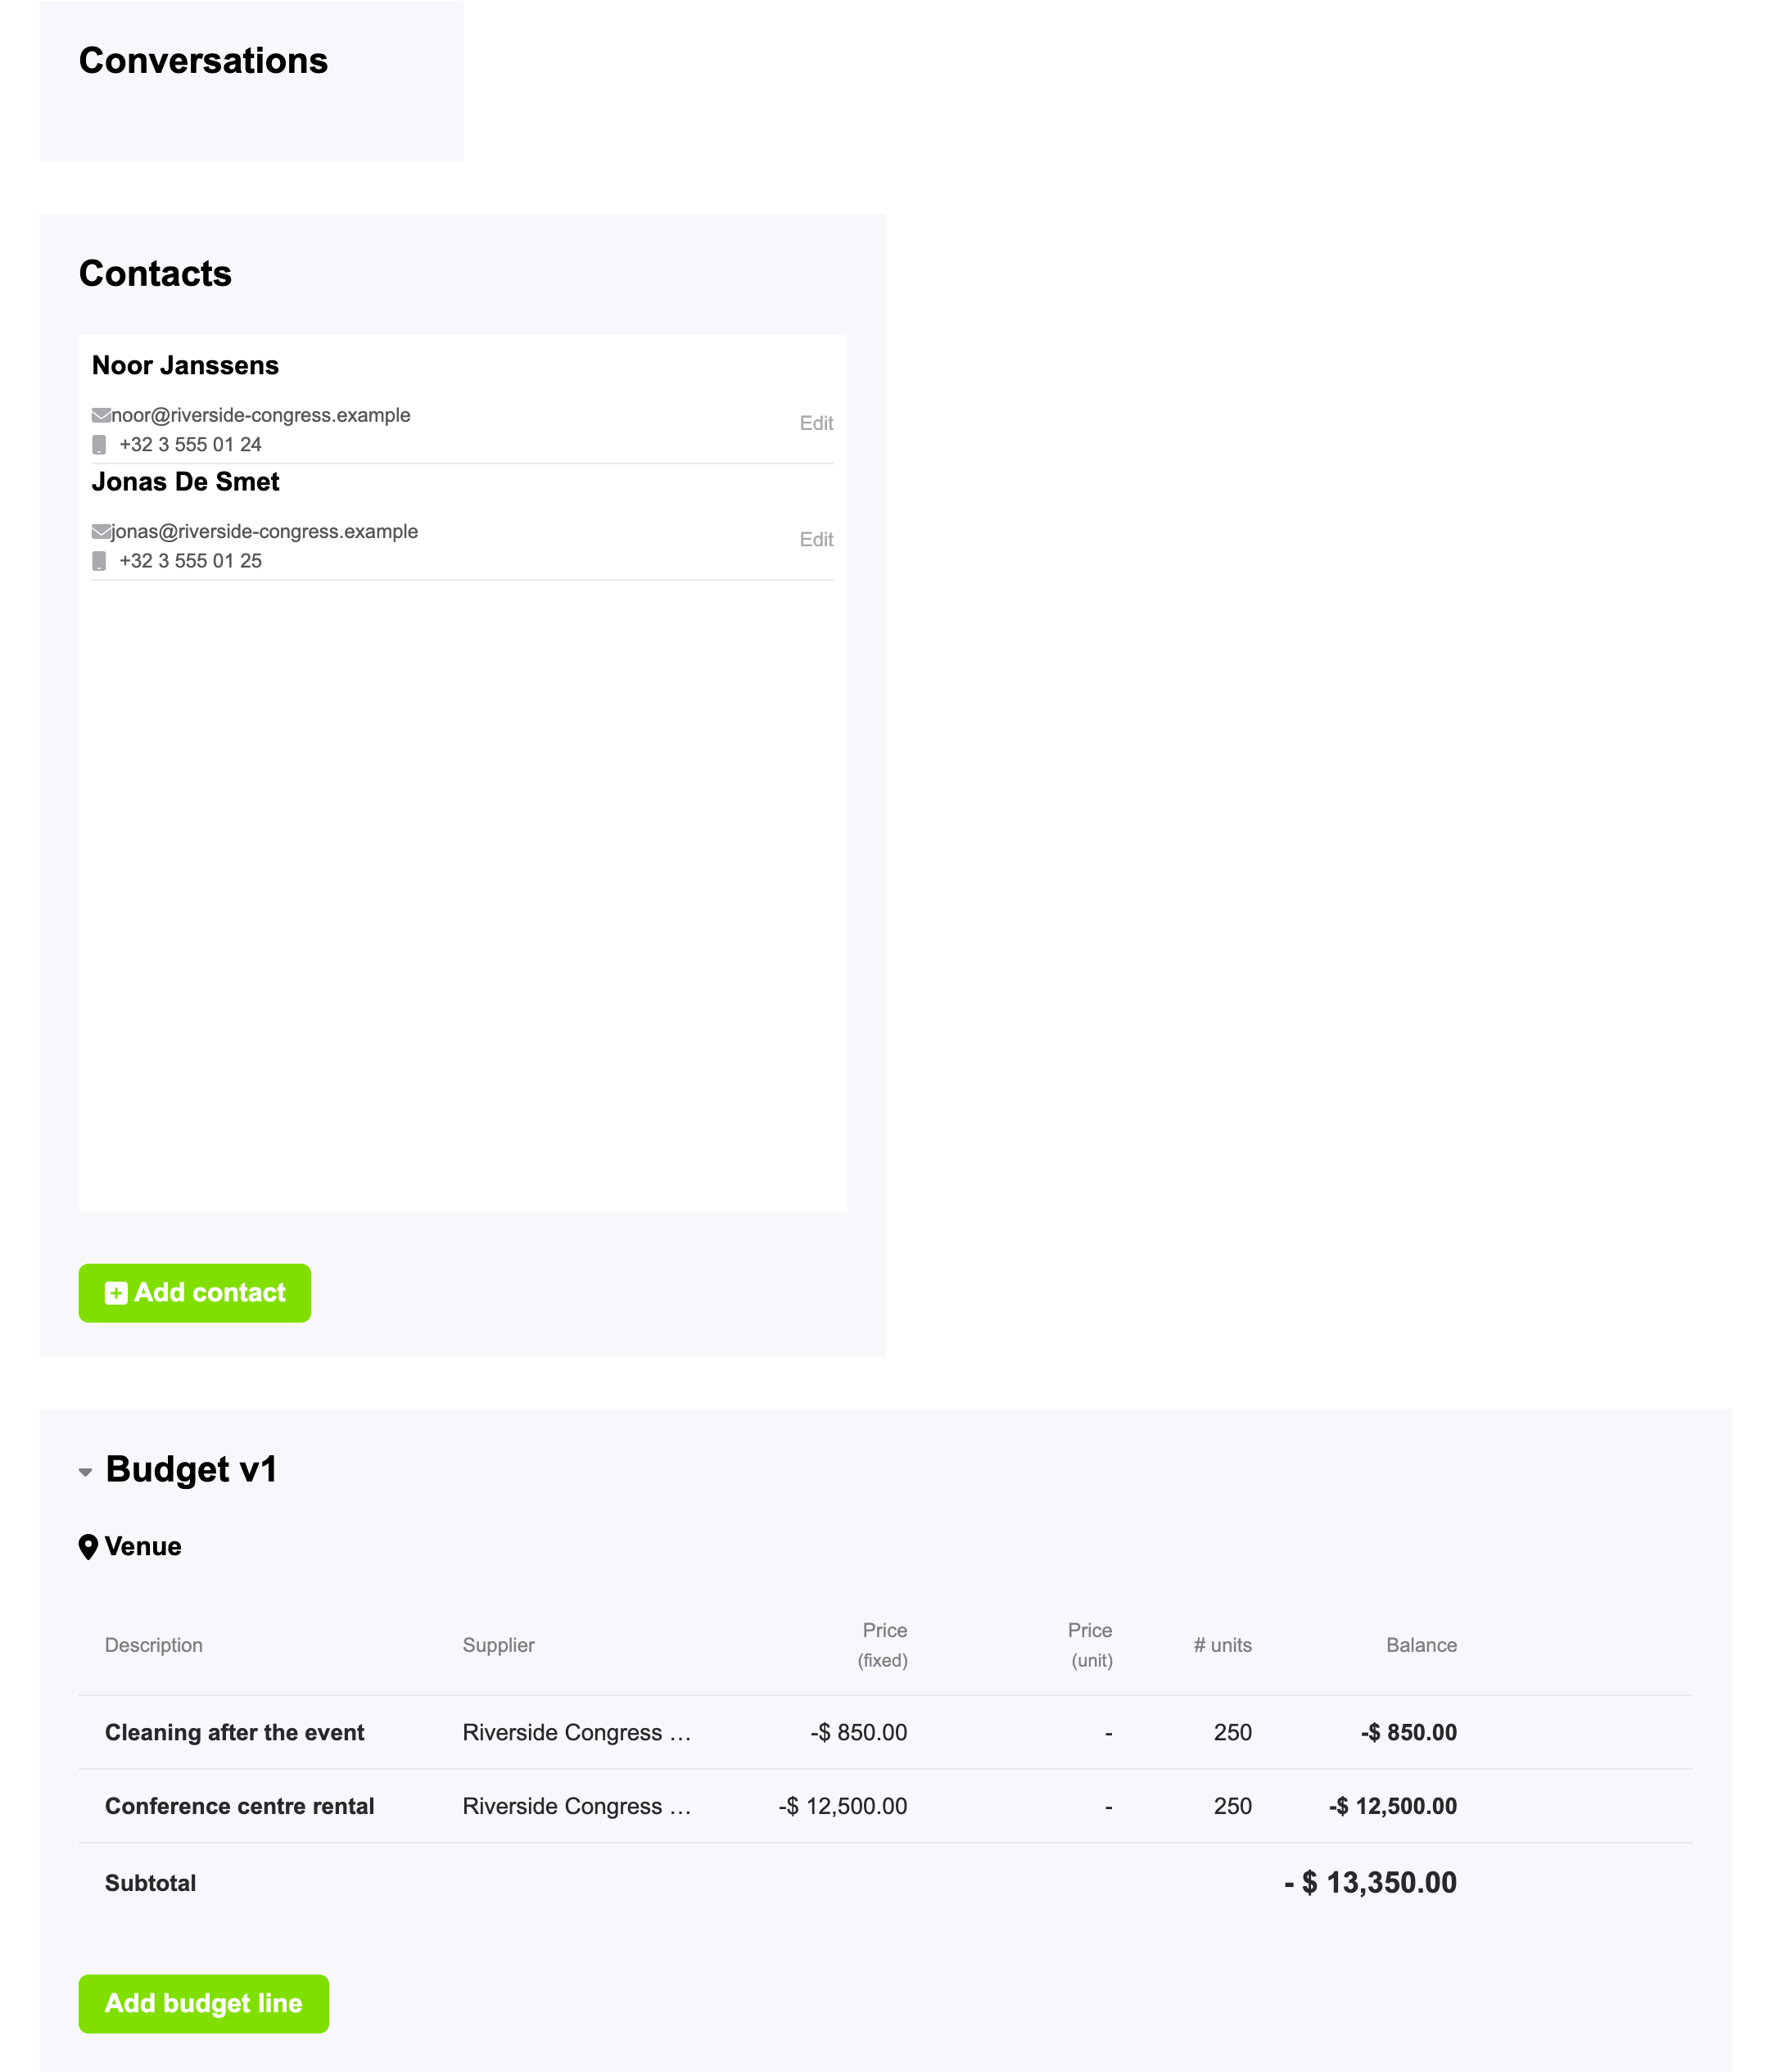
- Conversations: the conversations about this event with this business in the eventplanner.net inbox, whoever on your team started them: a quote you requested from the directory for this event, or a conversation started from this page. You see the latest message of each, and a dot for the unread messages in your own conversations. Click Start new conversation to write to the business about this event: your inbox opens in a new tab. This block only works for a business with a page on eventplanner.net.
- Contacts: the people you work with at this supplier, such as your account manager or the person on site. Click Add contact and fill in their name, e-mail address and phone number. A contact added here is a record for you and your team: nothing is sent to the person. Only when you tick Create user and set their access under Set contact access do they get an invitation to log in and work in the event software with you. Click Edit next to a contact to change them.
- Budget: the budget lines of this supplier in Budgets, grouped by category, with their subtotals. The name at the top is the budget version you are looking at: click it to switch versions. Click Add budget line to add a cost or revenue for this supplier without leaving the page. Read more in how to use Budgets.
Good to know: the contacts you add are personal data of the people at your supplier. You process them as the organiser of the event under our processing agreement: only add what you need, and remove contacts you no longer work with.
Remove a supplier
Click Edit at the top of the page of the supplier, then Remove supplier and confirm. The supplier, its checks and the links to its contacts and budget lines are deleted. This cannot be undone. The contacts themselves stay in Team & access and the budget lines stay in your budget, without the supplier.
A supplier cannot be removed while one of its checks still has a task. Open Enable checks first and turn every check off, which deletes their tasks, and then remove the supplier. Tasks you added to the supplier yourself stay on your checklist.
6. Link a supplier to its business page later
Typed a supplier yourself, and did that business get a page on eventplanner.net since? Every day we compare your unlinked suppliers with the business pages, on their name, e-mail address, website, VAT number, postcode and city. When we find a match, the page of the supplier shows a message that the business has recently joined our platform, with the matching business pages listed below it. Click Link company next to the right one.
From then on, the supplier works like a business you picked from the list in section 2: its name, address, website and VAT number follow the business page, you see its logo and review score, and you can start a conversation from its page. Check the e-mail address and phone number afterwards: the ones you typed are cleared when you link, so fill them in again if you still need them.
Good to know: the website you fill in for a supplier helps us find its business page, and a business that is not on eventplanner.net yet may get one later. You do not have to do anything for that: when the page exists, the page of your supplier offers you the link.
7. Work on it together
Suppliers is useful when you plan alone, and even more when you plan with a team. Add the people you work with in Team & access in the menu of your event. Under Set contact access, choose what each of them may do in Suppliers:
| Access | What they can do |
|---|---|
| No access | They do not see the supplier list. This is the default for a new contact. |
| Read | They see the supplier list and the page of every supplier, but cannot add, change or remove suppliers or checks. |
| Manage | They can add, change and remove suppliers, choose their checks and change the checks of the event. |
A contact gets an invitation by e-mail and logs in with their own eventplanner.net account. Read more in how to manage users in the event software.
Two things to keep in mind:
- Every person who opens Suppliers needs a .PRO membership of their own, whatever their access. A colleague without a membership sees Unlock .PRO features, also with Manage access.
- The blocks on the page of a supplier follow the access to their own tool: a contact adds tasks with their Checklists access, contacts with their Contacts access and budget lines with their Budgets access.
Tip: a supplier page holds sensitive information, such as the prices of your suppliers and the conversations with them. Give Manage access only to the people who really work with the suppliers, and think twice before you give a supplier access to the supplier list of your event.
8. Suppliers in the rest of your event software
Suppliers connects the other tools of your event. You enter a supplier once and meet it everywhere:
- Checklists: every check creates a task, and every task you add from the page of a supplier shows a link to that supplier on the board.
- Budgets: budget lines with a supplier show up in the Budget block of that supplier. Adding a line in Budgets for a supplier that is not in your list yet? Tick Create supplier under the supplier field to add it to the list at the same time.
- Team & access: a contact you add in Team & access for a business that is already a supplier is linked to that supplier automatically. When you edit a contact, Linked supplier lets you link them to any supplier of the event. A supplier with a linked contact or a budget line moves to the selected list.
- Briefings: send your selected suppliers the information they need for the event. In a briefing, pick the suppliers or a whole supplier type as recipients. The briefing goes to the contacts that are linked to those suppliers, so add the right contacts first.
- Moodboards: a business you pin to the moodboard of your event is added to its unselected suppliers, so you can compare and select it later.
Copy your suppliers to your next event
When you create a new event from an earlier one, the copy wizard has a step Copy these suppliers. Every supplier is ticked: untick the ones you do not want to bring along, or click Deselect all and pick. The copied suppliers come with their supplier type, their details, their contacts, their checks and the tasks of those checks. They all land in the unselected list of the new event, so you decide again who you work with, and nothing is sent to the suppliers. Read more in how to set up an event.
9. After the event
A week after the date of your event, we send you an e-mail: Review your event suppliers. It lists the selected suppliers of your event that have a business page on eventplanner.net, each with a link to review them. A review takes a few minutes and helps your suppliers and your fellow organisers alike. We only send it when you are subscribed to our e-mails, so check your newsletter settings if it does not arrive.
Frequently asked questions
Is Suppliers free? No. Suppliers is a .PRO tool. Without a membership you see Unlock .PRO features with a button to upgrade. All other tools of the event software keep working without a membership, with the limits of the free version.
My colleague has access to Suppliers but sees Unlock .PRO features. Why? The membership is checked for the person who opens the tool. Your colleague needs a .PRO membership of their own, also when you are a member and gave them Manage access.
How many suppliers can I add? As many as you need. There is no limit for members.
Does the supplier know that I added them? No. Nothing is sent to a supplier when you add, change, copy or remove them. Only a contact you add with Create user gets an invitation, and your suppliers receive a briefing when you publish one in Briefings.
Why can't I remove a supplier? A supplier with checks that still have tasks cannot be removed. Open Enable checks on its page, turn every check off and save, then remove the supplier.
Why is the website refused? The website has to be the complete address of a site that is online, such as https://www.example.com. A misspelt address, a site that is down or a page that does not exist is refused.
Why can't I add the same business twice? A business with a page on eventplanner.net can be linked to an event only once. Open the supplier you already have and change it instead.
What is the difference between a supplier and a contact? A supplier is a business: the venue, the caterer, the band. A contact is a person: your account manager at the caterer or the stage manager of the band. You link contacts to a supplier on its page, and you give a contact access to your event in Team & access.
Can I change the checks after I added suppliers? Yes. Click Edit checks above the supplier list. A new check is added to every supplier of the event, with a task each, and you turn it off per supplier where it does not apply.
How do I mark a check as done? A check has no tick box of its own: its status is the status of its task. Open the task, from the page of the supplier or from the board of Checklists, and set Progress to Done, or drag the task to the Done column of the board.
Why does a supplier I copied from another event have no checks? Copied suppliers land in the unselected list, with the checks and tasks of the original. A copy without checks had none in the original event either. Move the supplier to the selected list on its page and it gets all checks of the new event.
Read also
- Master eventplanner.net: Complete guide and training to our event software
- How to set up an event in the eventplanner.net event software
- How to use Moodboards?
- How to use Checklists?
- How to use Callsheets?
- How to use Budgets?
- How to use Briefings?
- How to use Tickets?
- How to use Floor plans?
- How to manage users in the eventplanner.net event software?
- eventplanner.net certification
