Easily manage all the action points for your event with Callsheets.
Building call sheets in Excel is a hassle. And while there are better options out there, not everyone has access. But with Callsheets, you can easily manage all the action points for your big event in a few clicks. Easily assign ownership and share it with the whole team, all 100% free of charge.


How do you create a script or call sheet for your event?
A playbook lists all the actions that need to happen before, during and after your event. It is a handy overview of who, what, when and where you have to do something. With the eventplanner.net event software you no longer have to make your script in Excel, but you can do it very quickly online and share it with your entire team. You decide for yourself who can only view or modify the call sheet.
To use the online call sheet, you must first create an event. Once you've done this, you're good to go.
Creating a new event can be done directly from the mood boards page, which can also be accessed via the 'event software' link in the header of our website (if you're logged in), or via the 'add to new event' link whenever you like a business page or save a post.
You can create a call sheet for every event you organise. This can be done directly from the Callsheet page, which is also accessible via the 'event software' link in the header of our website (if you are logged in).
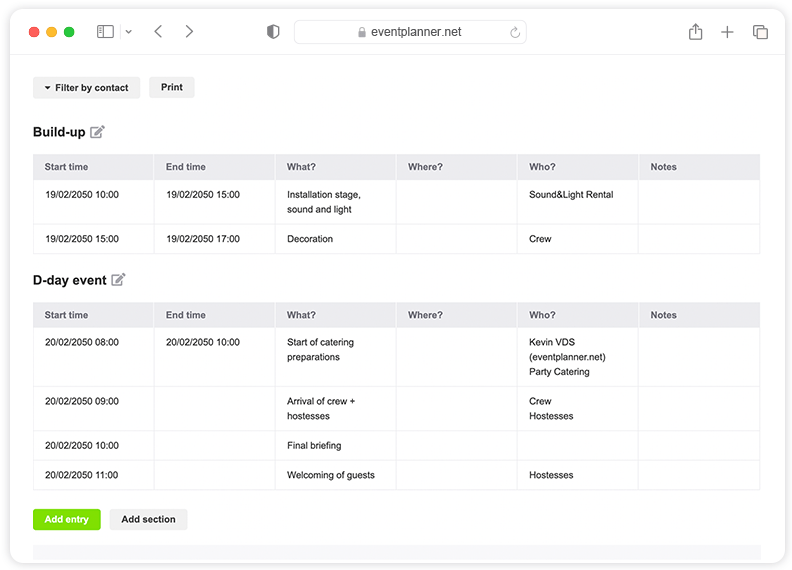
Click on 'add line' to add a new action to your call sheet. You will get a pop-up in which you can enter this data:
- Start date/time: when should the task start? Enter both the date and the time.
- End date/time: does the action have to be ready before a certain time? Then enter the end date and time here. If there is no specific end time for the task, you can leave it blank.
- What: briefly describe 'what' must be done
- Who: Start typing here the name of the person who should perform the action. Select the person in the dropdown. If the person has not yet been added to the event as a contact person, select 'add contact'. TIP! You can associate multiple contacts with one action.
- Where: here you can enter the location. Handy for an event with multiple zones, for example.
- Comments: here you can enter any additional comments.
- Add to section: if there are multiple sections in your call sheet (see below for more information) you can select one or more sections in which to display the action.
Click on 'add line' at the bottom to save the action. You will immediately see them appear in your call sheet.
You can change a line by clicking on it. You can then edit and save all fields or delete the line with the 'delete' button.
Sometimes it is useful to divide your call sheet into sections. For example, a section for 'building up', 'day of the event' and one for 'breaking down'. It can also be useful to set up a section per day for events that run over several days.
By default, all actions fall into the 'default' section, but you can add additional segments via the 'add section' button. You can change the name of the sections by clicking on the pencil icon.
During your event you can always consult your call sheet via the eventplanner.net app, but sometimes it is just a little easier if you can print your call sheet. So you can quickly catch up in the heat of battle and have a backup in case your internet connection goes down. The 'print' button at the top of your script takes you to a print-friendly version.
When you have a long to-do list, it is useful to only see your own tasks or those of a colleague. That's possible! Click on 'filter by contact' at the top and select the person or people whose tasks you want to see on the board.
Free Event Planning Software
Think of all the tools you use when planning truly memorable events: mood boards, checklists, call sheets, ... Now imagine having all those tools in one convenient place!
Discover all tools
Compare plans
Free
Free plan includes:
-
Moodboards
-
Checklists
-
Callsheets
-
Tickets
-
iOS & Android apps
.PRO
Includes Free, plus:
-
All premium features
-
Unlimited events
-
Unlimited team members
-
File uploads (up to 1GB storage)
-
Support
Enterprise
Includes .PRO, plus:
-
Enterprise-grade security & governance
-
Tailored onboarding
-
Premium support
A call sheet ensures that everyone involved in organising your event knows exactly what to do, where and when. Such a professional event script or call sheet is indispensable if you want to organise a perfectly organised event that runs smoothly.
You may know the word call sheet: that is a planning of the recording day of, for example, a film production. This script contains all practical information such as the shooting times, what will be filmed, addresses of the locations, contact details of the crew members, etc. But you can also use such a call sheet for other projects, for example for events.
A call sheet for your event = structure
You create a scenario for an event to keep an overview before, after and during the event. You provide structure with this. Tip: divide your call sheet into different parts or sections. This can be, for example: preparation, build up, day of your event, day after your event.
Many practical and technical aspects are included in an event call sheet: start and end date and time, what must be done, who must perform the action and where (the location or place where your event takes place).
Bye bye Excel, welcome online call sheet for your event
Creating a call sheet for an event is often done in Excel. But you no longer have to work in spreadsheets. A script for organising an event can perfectly be done online or via an app. Welcome 21st Century! No more hassle with versions, no more miscommunications with forwarding to all those different mailboxes: everyone has the latest and correct version of the call sheet for your event at all times, exactly the version you need as an event employee or event supplier.
Communication is key
Do you have all your action points in order? Make sure that everyone involved knows the call sheet for organising your event, your employees and your suppliers. You can keep colleagues in the loop (read rights), but you can also give them rights to participate in the script (edit rights). You decide who gets which rights. This makes real online collaboration possible. This way everyone knows what, where and when to do and your event will run smoothly. A tip: provide your most important team members with a paper version to quickly write something down or as a backup when the internet is not working.
Not to be missed: the eventplanner.net Callsheets
With eventplanner.net's Callsheets you can easily manage all the action points of your event in a chronological order in just a few clicks. With the eventplanner.net Callsheets you assign a responsible person to the tasks and share it with the entire team. The tool is perfectly suited for small, large and online events: from trade fairs, music festivals, conferences to larger private parties such as weddings, baby showers and retirement celebrations.
Callsheets in an integrated event software package
As an event organiser you have hundreds of things on your mind. Handy when you have integrated your tools as much as possible and you can share them with your team so that everyone is aligned. This is possible with a professional event planning software. Your event scripts where you easily manage all action points, but also an event project management tool, event mood boards and event checklists can be found in the integrated software solution of eventplanner.net. Moreover, as an event professional you use these tools completely free of charge. No time to waste? To work!

