
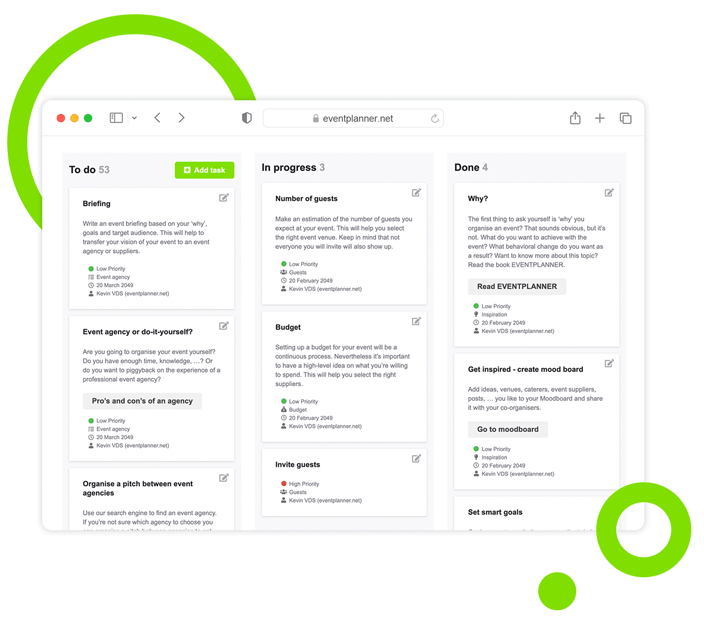
Manage Tasks and Assign Roles with Event Checklists
Turn complex events into simple, actionable steps. Create detailed task lists, and let your team, partners and vendors collaborate in a shared space.
Trusted by 179,000+ Event Organisers
Map Out Your Events and Get Things Done
Stop juggling event planning across Trello, Slack, Notion, Excel or Google Sheets. Centralise responsibilities, suppliers, and team efforts with our event checklists.
Stay Organised
- Keep track of every detail without missing deadlines.
- Avoid duplicated efforts with clearly defined roles.
- Assign resources to high-effort or time-sensitive tasks.
Move Fast
- Save time with checklist templates based on event type.
- Never miss a key task with pre-built workflows.
- Achieve better outcomes by prioritising your tasks.
Maximise Resources
- Access a location-based directory of vendors and venues.
- Find the right vendors quickly, based on your event type.
- Link tasks to vendors for easy planning and accountability.
Work In Sync
- Align your team members with shared tasks and notes.
- Keep task-related communication in one place.
- Collaborate with vendors directly from the checklist.
Discover Your Event Planning Toolkit
Learn how event checklists integrate with other planning features within our event software.
Moodboards
Capture ideas, curate inspiration, and explore vendors to shape your event's vision, theme, and personality.
Budgets
Manage your event budget and expenses. Get a complete overview of fund allocation and track your spending.
Ticketing
Generate event tickets and manage on-site registration. Create easy check-in experiences for your attendees.
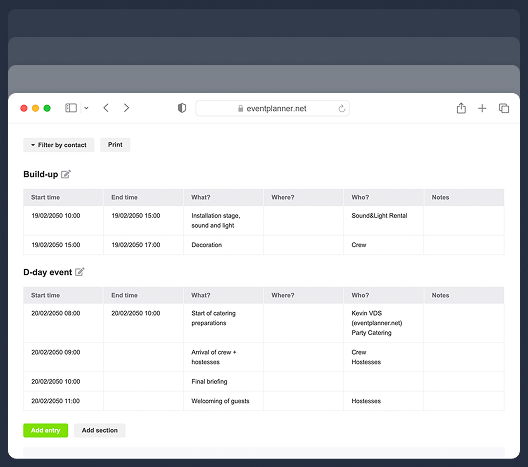
Call Sheets
Create a task list for pre-event and event days. Organise your team so everyone knows their responsibilities.
Event Checklist Setup
Choose flexible setup options and build the right checklist for your conference, meeting, festival or wedding.
Start With a Blank Checklist
- Create a customised checklist suited to your event.
- Build a structured workflow from the ground up.
- Add new tasks based on your event layout.
- Adjust your checklist as your plans change.
Reuse Past Event Templates
- Build upon the success of your previous events.
- Speed up planning with existing event checklists.
- Maintain consistency across recurring event plans.
- Use proven frameworks to reduce planning errors.
Use Ready-Made Templates
- Access pre-filled checklists based on type.
- Choose checklists for business, social, or special events.
- Begin planning with pre-defined, industry-standard tasks.
- Fine-tune the checklist to align with your event needs.
Task Configuration
Break down complex events into clear, manageable tasks, and execute each step with precision.
Create Task Cards
It can be hard to keep track of tasks without a system. Use task cards to visualise and organise every detail.
-
Add clear titles to identify tasks at a glance.
-
Include descriptions for detailed context.
-
Keep task details in one place for reference.
Choose Task Category
Scattered task lists can slow you down. Group tasks by categories for better event management.
-
Use categories like catering, venue, or marketing.
-
Reduce complexity by organising tasks logically.
-
Locate tasks related to each part of your event.
Add Priority Levels
Key tasks can get lost in the shuffle. Assign urgency levels to focus on tasks that matter most.
-
Mark tasks as Low, Medium, or High priority.
-
Organise tasks visually by using colour coding.
-
See priorities instantly with top-of-card indicators.
Add Progress Status
Teams can lose track of what's been done. Use status indicators to communicate task progress.
-
Label tasks as To Do, In Progress, or Done.
-
Tasks move automatically as their status changes.
-
See a clear overview of progress at all times.
Set Task Deadlines
Missed due dates can derail event plans and cause stress. Assign deadlines to keep tasks on track.
-
Break down large goals into manageable timeframes.
-
Allocate time effectively with clear scheduling.
-
Receive timely reminders on tasks that need attention.
Assign Task Ownership
Unclear responsibilities lead to confusion. Assign tasks to team members for better accountability.
-
Tag team members directly on specific tasks.
-
Send automated notifications when assigning tasks.
-
Reassign tasks quickly if priorities change.
Task Management
Adapt to changing plans with ease. Keep your event under control in the face of uncertainty.
Order Tasks as Kanban
Tracking multiple tasks simultaneously? Organise and prioritise them visually with Kanban.
-
Sort tasks into To Do, In Progress, and Done columns.
-
Monitor task completion with an easy-to-read layout.
-
Rearrange tasks within columns with drag and drop.
Filter Your Tasks
Finding tasks can be tough with a big team. Filter by contact to see who's responsible for what.
-
Search by assignee to view individual responsibilities.
-
Track your team's bandwidth by monitoring workloads.
-
Simplify your work by narrowing your task view.
Leave Task Notes
Important details can get lost in communication. Add notes directly to tasks for clarity.
-
Provide instructions or updates for your team members.
-
Break down tasks into sub-tasks for better understanding.
-
Attach supporting documents for additional context.
Send Task Notifications
Your team members may miss important updates. Send automated notifications to keep everyone informed.
-
Automatically alert team members about new tasks.
-
Instantly notify everyone of deadlines or tasks due 'today'.
-
Send automated updates about new task comments.
Vendor Integration
Manage collaboration with your vendors and venues directly from the event software.
Use Pre-Set Vendor Tasks
When choosing an existing checklist template, vendor search will be automatically added to tasks.
-
Display tasks that require vendors' assistance.
-
Get one-click access to the vendor directory.
-
View different vendor types depending on the task.
Access Local Directory
Speed up event preparation by accessing a list of vendors and venues near the event location.
-
Access vendor profiles with key event information.
-
Browse vendor options tailored to your event location.
-
Quickly compare vendor options by distance.
Filter Vendors and Venues
Too many alternatives can make selection overwhelming. Narrow your options with multiple filters.
-
Apply filters to sort vendors by category or service.
-
Use ultra specific criteria to find the best match.
-
Refine your search based on reviews and ratings.
Explore Vendor Details
Lack of information can slow decision-making. Access a detailed overview of each vendor.
-
Read more about the vendors' profiles and services.
-
Check past performance and client feedback.
-
Compare different vendor profiles at a glance.
Request Vendor Quotes
Start your communication with shortlisted vendors and venues by reaching out with just a few clicks.
-
Request more information directly from the directory.
-
Request a quote with a pre-defined email template.
-
Receive vendor replies to your planning dashboard.
Assign Tasks To Vendors
Collaborate with vendors and venue reps directly from event checklists and other tools.
-
Create new tasks for event vendors and venue reps.
-
Include task-related notes and documents for vendors.
-
Track vendor task progress alongside your event timeline.
Team Collaboration
Set permission levels for better control and accountability. Decide if collaborators see only their tasks or the full checklist — and define what actions they can take.
Task Visibility
Manage task visibility to maximise security, focus, and accountability across your team and vendors.
-
Secure sensitive tasks by restricting access.
-
Keep the team focused by showing only individual tasks.
-
Enable oversight by granting managers full task visibility.
Task Access
Manage the access levels team members, vendors, and venue reps have for different planning tasks.
-
Read Access
Allow team members or vendors to view tasks and progress updates without the ability to make changes.
-
• Provide secure visibility without risking data integrity.
-
• Keep everyone aligned with timely progress updates.
-
• Prevent accidental edits or changes to task priorities.
-
-
Comment Access
Some team members or vendor reps may need to provide input without editing rights.
-
• Enable feedback without altering task details.
-
• Centralise all task-related comments for easy access.
-
• Ensure every voice is heard with feedback loops.
-
-
Full Access
Grant selected team members complete control to create, edit, and manage tasks as needed.
-
• Provide key collaborators with full administrative rights.
-
• Allow task creation, editing, and deletion.
-
• Maintain accountability with clearly defined roles.
-
Discover Your Event Planning Toolkit
Learn how event checklists integrate with other planning features within our event software.
Visualise Tasks
Transform scattered plans into organised action. See tasks and progress in one place, driving team alignment.
Track Every Detail
Hit every detail and deadline. Keep a thorough overview of your tasks and deliver events exactly as planned.
Spot Bottlenecks
Keep things moving. Spot potential delays early, resolve bottlenecks, and maintain consistent progress.
Repeat Success
Execute great events to achieve your goals. Create memorable experiences, and build repeatable success
Frequently Asked Questions
-
How do I start using event checklists?
Sign up for a free account, create an event, choose its type, and the system will automatically generate a pre-made checklist template. From there, you can add, change, or delete tasks to match your specific needs. Or, if you prefer you can also start from a blank slate or a template from one of your previous events.
-
Can I customise the pre-made templates?
Yes, every task in a pre-made template is fully editable. You can adapt it to your event's unique requirements.
-
What if I don't want to use the predefined event checklist?
You have two options. When creating the event, select 'start from a blank checklist', and the system will automatically generate a new event checklist that you can populate from scratch with tasks. Alternatively, you can start your checklist based on a previous event which is very powerful for recurring events.
-
Can my team collaborate on tasks?
Yes, you can set different permission levels, assign tasks, and communicate with your team members, partners, volunteers and vendors directly through the task cards.
-
How do I manage vendors within the platform?
Pre-filled tasks include vendor integrations. You can access vendor profiles, request quotes, and assign vendors to specific tasks directly from the platform.
-
What if I need to create sub-tasks for my tasks?
You can do that using the task description or comments section. Manually include all the sub-tasks a task involves. Or, you could create a task for each sub-task and group them by using smart naming.
-
Will I receive notifications when there's a deadline?
Yes. You'll receive a list of tasks to focus on to your email inbox, along with their due dates. This way, you can stay on top of your responsibilities and ensure nothing is missed.
-
How can I keep track of all event planning tasks and deadlines?
Successful event planners use checklists and timeline tools to stay organised. Start by listing out every task - venue booking, invitations, vendor confirmations, rehearsals, etc. - and assign deadlines. You can do this on spreadsheets, but an event project management tool is more efficient. Dedicated software will send you reminders, allow team collaboration, and visualise your timeline. In our platform, for instance, you can create a digital checklist, assign tasks to team members, and get notified as each item is completed, ensuring nothing is missed.
-
What is an event planning checklist and why do I need one?
An event planning checklist is a step-by-step list of all the tasks you need to complete before, during, and after your event. It helps you stay organised, meet deadlines, and ensures that no critical detail is overlooked. Using a digital checklist in event management software allows you to assign tasks, track progress, and collaborate with your team in real time. It transforms your checklist into a true event project management powerhouse.
-
What are the essential items to include in an event checklist?
Key items typically include venue booking, permits, vendor confirmations, budget tracking, equipment rental, catering arrangements, guest list management and post-event follow-up. Our platform offers ready-made checklist templates that you can customise for your specific event type.
-
How does a digital checklist differ from using Excel or spreadsheets?
While Excel or paper lists are static, digital checklists offer dynamic features: task assignments, deadline alerts, real-time collaboration, and progress tracking. They reduce the risk of miscommunication and last-minute surprises because everyone sees updates instantly.
-
What's the difference between an event checklist and a callsheet?
An event checklist is a list of all the tasks that need to be completed during the planning phase. A callsheet, on the other hand, is a detailed run-of-show schedule that outlines who is responsible for what task at specific times on event day. Both are essential, and our software allows you to create and manage both in one place.
-
Why is eventplanner.net better for events than tools like Monday.com, Asana, ClickUp, or Jira?
While popular project management tools like Monday.com, Asana, Clickup, Jira, Zoho and Bascamp are great for managing generic tasks and workflows, they aren't built with the specific needs of event planners in mind. Organising an event involves much more than ticking off tasks — you need to manage budgets, coordinate vendors, create detailed callsheets (run-of-show schedules), handle guest registrations, and ensure everything comes together seamlessly on event day. That's where eventplanner.net stands apart. Our platform combines powerful project management features like task lists and checklists with specialised event tools—such as budget tracking, vendor management, callsheets, ticketing, and guest list management—all in one place. Instead of juggling multiple apps, you have a fully integrated workspace designed specifically for event organisation.
free forever
Perfect for professionals and smaller event planning teams managing one event at a time.
from per seat/month
Great for professionals and larger teams managing multiple events at a time.
from per month
Perfect for organisations requiring custom solutions, advanced security, and dedicated support
Event Planning Software That Grows With You
Select a plan that matches your ambitions, whether you're managing a single event or running multiple projects simultaneously.

